Play live with Musician using a MIDI keyboard.
As you may know, there is no way to use MIDI natively in World of Warcraft. MusicianMIDI doesn't work out of the box, it requires third party software to convert MIDI events coming from your MIDI keyboard into standard PC keystrokes that can be then processed by the add-on.
This step-by-step guide will explain how to install and configure all the required software, and how to resolve the most common problems you may encounter.
Feel free to join our Discord server for further assistance.
- Software installation
- Configuration for macOS
- Configure your MIDI input device
- How to play
- Deal with audio delay in Microsoft Windows
This add-on requires the external Bome MIDI Translator software to convert incoming MIDI messages from your controller into keystrokes that can be processed by the add-on.
Bome MIDI Translator exists in 2 versions :
- The Classic version is the one that is recommended if you play on Windows. It's very simple and easy to use. It's a charged program for commercial use (€ 29) but you can use it for free without any limitation (remember WinRAR).
- The Pro version is the only option if you play on macOS. It's more complex to use than the classic version. It costs € 59 but you can use the free trial version provided that you don't mind restarting it every 20 minutes.
You can also request a free license for the Classic or the Pro version by sending a postcard to the developers.
If you run macOS, a few extra configuration steps are required for this setup to work properly.
MusicianMIDI needs the function keys to be enabled. After following these steps, make sure there is no other system shortcut using them.
- Go to the Apple menu > System Settings.
- Click the Keyboard section in the left menu (or type
keyboardin the search box). - Click the Keyboard Shortcuts… button.
- Click Function Keys in the left menu.
- Enable Use F1, F2, etc. keys as standard function keys.
- Click Mission Control in the left menu.
- Uncheck the Show Desktop shortcut if the F11 key is set (default).
- Click Done.
- Go to the Apple Menu > System Preferences > Keyboard.
- Go to the Keyboard tab.
- Check Use F1, F2, etc. keys as standard function keys.
- Go to the Shortcuts tab.
- Click Mission Control and uncheck the Show Desktop shortcut if the F11 key is set (default).
Bome MIDI Translator Pro needs accessibility permissions to send keystrokes.
- Go to the Apple menu > System Settings.
- Click the Privacy & Security section in the left menu (or type
securityin the search box). - Click Accessibility.
- Enable Bome MIDI Translator Pro.
- Validate using your system password or fingerprint.
- Go to System Preferences > Security & Privacy.
- Click Accessibility.
- Click the padlock 🔒 to allow modifications.
- Check MIDI Translator Pro in the list.
-
Connect your MIDI controller.
-
Start Bome's MIDI Translator Classic.
-
Open the
Musician preset.bmtpfile that is provided in theInterface/AddOns/MusicianMIDIfolder. -
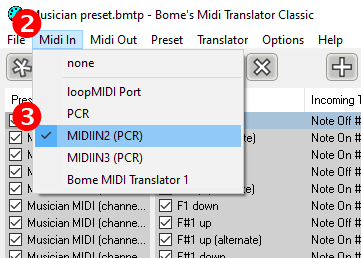
Open the Midi In menu.
-
Select your MIDI input device.
-
Connect and turn on your MIDI controller.
-
Start Bome's MIDI Translator Pro.
-
Open the
Musician preset.bmtpfile that is provided in theInterface/AddOns/MusicianMIDIfolder. -
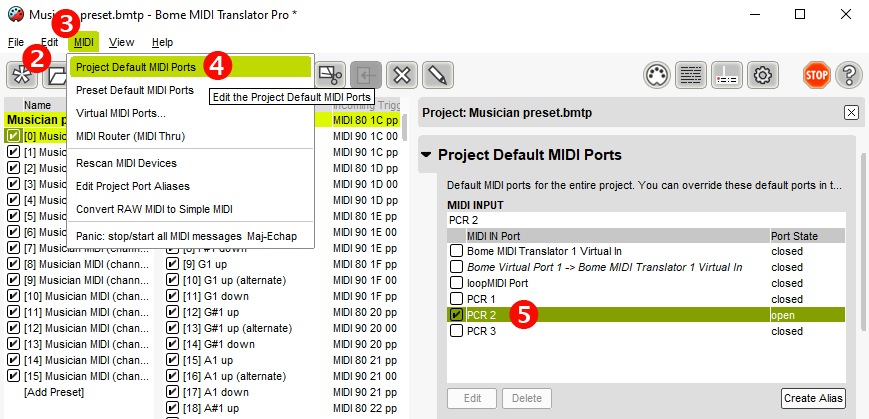
Open the MIDI menu option then click Project Default MIDI Ports.
-
Select your MIDI INPUT device in the right column under MIDI IN Port.
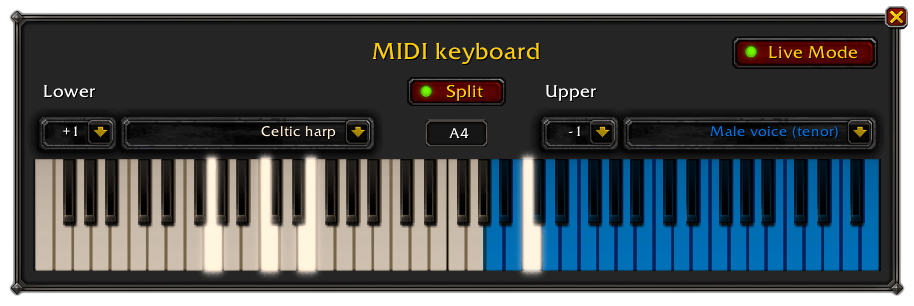
In WoW, open Musician's menu by clicking on the minimap icon then choose Open MIDI keyboard or type /mus midi. You can play live using your MIDI keyboard as long as the MIDI keyboard window is focused in game.
The keyboard can be split in 2 layers to set a different instrument and/or octave on each side. Click the Split button to activate split mode. To change the split point, click on the split point text field then press the piano key you want as a new split point.
The keyboard can also be activated by clicking the on-screen keyboard keys.
Since MusicianMIDI relies on computer keyboard keystroke emulation, almost all the keyboard keys will trigger a note, including Esc, Enter and the function keys. The MIDI keyboard window should remain open and the WoW application focused to work. Click the X button to close the MIDI keyboard.
The piano keyboard range goes from E1 (28) to G7 (103) which corresponds to a standard 76-key piano. Playing out of range keys has no effect.
As with the built-in live keyboard interface, you may experience some delay between the moment you press a key and when the sound actually starts playing, which can be awkward for a live performance.
This problem is more likely to occur on Microsoft Windows because WoW only supports Microsoft's legacy audio interface and is not compatible with the newer low latency interfaces used by music programs.
Mac users don't experience this problem because macOS was designed with music creation in mind.
Additional audio latency may also be caused by using wireless headphones or speakers. It's recommended that you use wired ones to reduce latency.
The solution is to use an external synthesizer for audio feedback, instead of relying on Musician's.
The easiest way to play live without audio delay is to use a keyboard that has its own tone generator, such as a digital piano or a synthesizer. You can mute Musician's audio using the minimap icon and refer to your actual instrument's audio for playing.
If your MIDI keyboard is a controller only – or if you just to play using Musician's instruments – you can run a software synthesizer on your computer along with Bome's MIDI Translator and use it for audio feedback.
The best soft synth you may use is Sforzando because it's free and it supports Musician's soundfonts.
On Windows, you need an ASIO driver in order to run Sforzando with no audio delay.
If you don't already have one that comes with some music software installed on your PC such as FL Studio, you can download and install FlexASIO which is for free and open-source.
To avoid issues, close any program that uses audio and MIDI before starting, including WoW and Bome's Midi Translator.
-
Launch Sforzando.
-
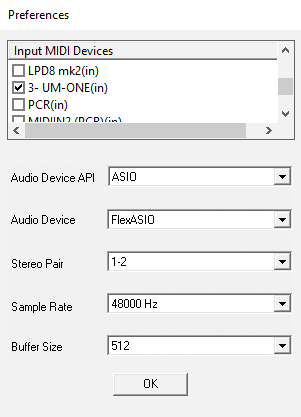
Click Tools > Preferences.
-
Under Input MIDI Devices, check the one that corresponds to your MIDI keyboard.
-
For Audio Device API, select ASIO.
-
For Audio Device, select your favorite ASIO driver such as FlexASIO or FL Studio ASIO.
-
Select the smallest Buffer Size possible for minimal delay (256 or 512 is good).
-
Leave the other parameters default (Stereo pair 1-2 and 48KHz).
-
Click OK.
-
Drag and drop any
.sfzfile from Musician'ssoundfontsfolder into Sforzando. -
Try playing on your MIDI keyboard, you should hear music.
-
Launch Bome's Midi Translator and a text editor such as Windows' Notepad. Play some notes around the middle C on your MIDI keyboard, it should type down letters in the text editor while you hear your instrument playing.
⚠ If you get an error message such as Cannot open MIDI input device, this means your MIDI device can't be used simultaneously in 2 applications. Check the Configure virtual MIDI cable section below to resolve this.
Your MIDI controller may not be usable on several applications at the same time.
The trick is to configure Bome's Midi Translator to duplicate the incoming MIDI messages from your controller to Sforzando using a virtual MIDI cable.
-
Download and install loopMIDI.
-
Launch loopMIDI.
-
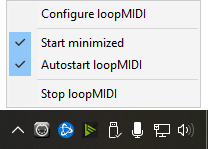
Right click on the loopMIDI tray icon
 then check Start minimized and Autostart loopMIDI so you won't have to take care of it in the future.
 -
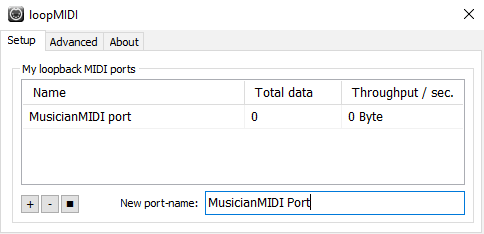
Click on Configure loopMIDI to open the main window.
-
In New port-name, type
MusicianMIDI Port(or any other name you like) then press the button.
 -
Launch Sforzando. Click Tools > Preferences, uncheck your MIDI keyboard device then check MusicianMIDI Port(in). Click OK.
-
Launch Bome's Midi Translator.
-
If not already done, set your MIDI keyboard as MIDI IN device as explained earlier.
-
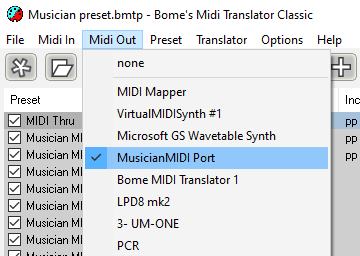
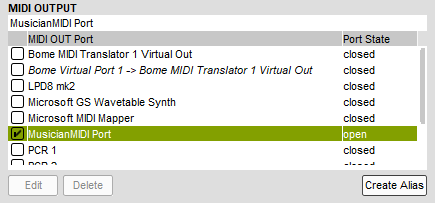
Set your MusicianMIDI Port virtual cable as MIDI OUT device:
In the Classic version, click Midi Out then select MusicianMIDI Port.
In the Pro version, click MIDI > Project Default MIDI Ports then check MusicianMIDI Port under MIDI OUTPUT.
-
Load a .sfz file in Sforzando, open a text editor then press a few keys on your MIDI keyboard to check everything works as expected.
⚠ Make sure to use the latest version of the Musician preset.bmtp file bundled with the add-on and check the MIDI Thru preset is present and enabled.
- Launch Bome's MIDI Translator.
- Launch Sforzando.
- Launch WoW.
- Open the Musician MIDI keyboard window in game.
- Mute Musician's audio using the minimap button.
- Drag and drop the
.sfzfile that corresponds to the instrument you want to play from the Musician or MusicianExtendedsoundfontsfolder into Sforzando. - Focus the MIDI keyboard window in WoW.
- Enjoy!
